博文
DOOSAN DL350 Wheel Loader Hydraulic Control Unit Reassembly Guide
||
Doosan Diagnostic Tool DDT G2 SCAN( ECU ,DCU)Software 2016
Reassembly
NOTE: Check all components for damage and replace
if necessary.Before installation,check free travel of all moving parts in housing.Spools can be exchanged individually.Oil components before reassembly according to ZF list of lubricants TE-ML 03.
Insert diaphragms with concave side facing upward until contact is obtained.
NOTE: Installation position,see arrows.
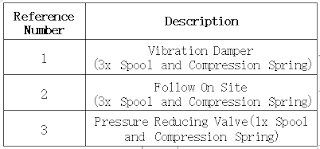
1. Figure 90,shows the following components:
2. Install components according to Figure 90.
NOTE: Preload compression spring of the follow on
slides and locate spool provisionally using cylindrical pins 05.0 mm (0.1969 in)(assembly aid),See Figure 91.
3. Install two adjusting screws.
4. Assemble gasket (1,Figure 92)and housing cover (Figure 92).Position housing cover uniformly,using adjusting screws,until contact is obtained and remove cylindrical pins (assembly aid)again(Figure 93).
NOTE: Pay attention to different housing covers.
NOTE: Install recess 015.0 mm(0.5906 in)(2,Figure
92),facing spring of pressure reducing valve.
(S)Adjusting screws -5870204036
5. Fasten housing cover using socket head screws.
NOTE : Torque limit 0.56 kg-m(4 ft lb).
(S)Box spanner (Torx TX-27)-5873042002
6. Install pressure regulators and secure using fixing plates and socket head screws.
NOTE: Install fixing plate,with claw facing downward.
Pay attention to radial installation position of pressure regulators,see Figure 95.
NOTE: Torque limit 0.56 kg-m (4 ft lb).
(S)Box spanner (Torx TX-27)-5873042002
7. Preassemble opposite side.
2023.07 Doosan DMS-5 Data Monitoring System Diagnostic Software
B.I nstall components according to Figure 96.
C. Preload compression springs of the follow on slides and locatespool provisionally using cylindrical pins O 5mm(0.1969 in)(assembly aid).See arrows.
D. Install two adjusting screws.
E.Assemble gasket(1,Figure 97)and housing cover, and position them uniformly against shoulder,using adjusting screws.
NOTE: Pay attention to different housing covers,install
the recess 019mm(0.7480 in)(2,Figure 97), facing the main pressure valve.
F. Fasten housing cover using socket head screws.
NOTE: Torque limit 0.56 kg-m (4 ft lb).
G. Remove cylindrical pins (assembly aid)again. (S)Adjusting screws -5870204036
(S)Box spanner (Torx TX-27)-5873042002
H.Install pressure regulators and secure using fixing plates and socket head screws.
NOTE: Install fixing plates,with claw facing downward.
Pay attention to radial installation position of pressure regulators,see Figure 98.
NOTE: Torque limit 0.56 kg-m (4 ft lb).
(S)Box spanner (Torx TX-27)-5873042002
l. Introduce cable harness and connect pressure regulators (6x).
NOTE: Pay attention to installation position of cable
harness,see also markings (Figure 79).
J. Introduce female connector against shoulder,with groove facing guide nose of cover.
K. Install gaskets(Figure 100)and fasten cover using socket head screws.
NOTE: Torque limit 0.56 kg·m (4 ft lb).
(S)Box spanner (Torx TX-27)-5873042002
L. Secure female connector using retaining clamp,see Figure 101.
M. Install opposite cover.
N. Install two adjusting screws and mount gasket l.
NOTE: Pay attention to different gaskets,see Figure
102 and Figure 105.
(S)Adjusting screws -5870204063
8. Intermediate plate-version with screens:
A. Insert screens(6x)flash -mounted into bore of intermediate plate,see Figure 103.
NOTE: Pay attention to installation position-screens
are facing upward (facing duct plate).
Doosan Diagnostic Tool UVIM Support Doosan Excavators High Quality
B. Mount intermediate plate,with screens with screens facing upward.
C. Mount gasket Il.
D.Mount duct plate and fasten it uniformly using socket head screws.
NOTE: Torque limit 0.97 kg-m (7 ft lb).
(S)Box spanner (Torx TX-27)-5873042002
E. Equip screw plugs (8x)with new O-rings and install them.
NOTE: Torque limit 0.61 kg-m (4 ft lb).
NOTE: The installation of hydraulic control unit is
described in following section,“Mount Duct Plate and Hydraulic Control Unit"on page -142.
免责声明:本文中使用的图片均由博主自行发布,与本网无关,如有侵权,请联系博主进行删除。
下一篇: DOOSAN DL350 Wheel Loader Hydraulic Control Unit Removal Guide
全部作者的其他最新博文
- • the hydraulic release of the single hydraulic circuit of the caterpillar311D LRR
- • JCB Backhoe Loader Power Shift - Chain Adjustment
- • Perkins 2806F Engine Inlet and Exhaust Valve Springs - Remove and Install
- • Caterpillar 312D2 and 313D2 Excavator 3054C Engine System Pressure- -Release
- • Parking Brake Lining Clearance and Lever Travel Adjustment on Isuzu Vehicles
- • Doosan DA30 Dump Truck the ECU Wiring Tier2 -Removal


